preloader
Top-9-Apps-Developed-using-Flutter icon

Top 9 Apps Developed Using Flutter

Top 9 Apps Developed Using Flutter

As a community supporting cross-platform development grew, Flutter stepped strongly into the game, and pushed the boundaries. The native look and feel of the apps and time-efficient development helped it gain popularity quickly in the eyes of big brands.

Flutter is an open-source, cross-platform app development tool. It was introduced by Google in 2017 and declared stable for production in 2018. Perhaps the most prominent Flutter side currently is that it’s gone beyond mobile. Mobile applications built-in Flutter can comply and run in modern browsers. This means that the same code base we write to create Android and iOS apps also creates web apps.

With all mentioned above, let’s dive deeper into the apps developed with Flutter and the big brands behind them.

Alibaba.com (eCommerce)Leading online B2B Trade Marketplace.

Alibaba.com app is a leading wholesale mobile marketplace for global trade, with around 800.000 downloads to the date of writing this post. The sleek and straightforward app enables users to navigate quickly through its numerous categories.

Alibaba Flutter app

Google Assistant (Productivity)Get things done, hands-free

Google Assistant is an app ready to help its users at a single “Hey Google.” Users can, amongst others, manage their schedules, control smart home devices, and send texts, all of which can be achieved hands-free.

Google Assistant app Flutter

Hamilton Musical (Entertainment)The Official App

The app enables fans to access content related to the popular American musical Hamilton that tells the story of American Founding Father Alexander Hamilton. The app bears an almost perfect score on Google Play. The fans love it because it keeps Hamilton’s experience alive.

Hamilton Musical app Flutter

Google Ads (Business)

The app helps users stay connected to their campaigns using smartphones. The app enables tracking ad campaigns in real-time, reviewing high-impact recommendations to optimize performance, and taking action quickly and easily.

Google ads app Flutter

Philips Hue app (Lifestyle)

The Philips Hue App is used to control Hue lights and accessories. Users review the app as easy to use and navigate. The app is rated with an almost perfect score on Google Play.

Philips Hue app Flutter

Reflectly (Health and Fitness)Journal / Diary

Reflectly is a personal journal and diary driven by artificial intelligence enabling users to deal with negative thoughts, make positivity louder, and overall teaching its users about the science of well-being.

Reflectly Health and Fitness app Flutter

The New York Times (News and Magazine)

New York Times app enables its users to follow the current events in the World through multimedia storytelling, award-winning journalism, and expert reporting.

The New York Times Flutter

Baidu Tieba (Social Network)

Baidu Tieba is the most used Chinese communication platform hosted by the Chinese search engine company Baidu. It is an entirely user-driven network service.

Baidu Tieba app Flutter
Litebit (Finance)Buy & sell Bitcoin

This is one of the newer apps on the platform, therefore it’s still in a process of polishing. The app is used for cryptocurrency trading. We admire the app because of the progressive way it handles information security.

Litebit app Flutter

Are you planning to build an app with Flutter?

The list of apps we shared as an example tells us that we can use Flutter to develop apps within various industries and levels of complexity. We love to share our knowledge, so if you’re a developer, in need of expert advice about Flutter, let us know, we’ll connect you with our colleagues, and help you completely free of charge.

If you have an idea for a mobile app, contact us and chat with our developers.
For more information about Flutter, check out our previous post.

Things to keep and eye on in Flutter in 2020

Things to keep an eye on in Flutter in 2020

Flutter is on the fast track to conquering cross-platform development, and we have big expectations in 2020.
State management was and remained a hot potato. Will some solutions be declared official, we still don’t know, but we have listed some of the most popular solutions and their up-and downsides.
Another thing that was big in 2019, and to our notion will be even bigger are Flutter tools for designers.
Let’s dive deeper.

Things to keep an eye on in Flutter 2020

What is Flutter?

Being one of the fastest-growing mobile app development tools, the Flutter framework is on the radar of every cross-platform developer. Introduced in 2017, and declared as stable for production in December of 2018, Flutter has become the faster-growing mobile app platform according to GitHub’s 2019 State of the October report. With the community getting mature and tremendous efforts of both Dart and Flutter teams, Flutter threatens to become one of the leading mobile app development tools and even revolutionizes the industry itself.
As it’s still a young development tool, these are the things you should keep an eye on in 2020.

State management

State management in Flutter raises a lot of dust. Official Flutter team encourages developers to search for the best solution, or choose one from the packages, provided by them or the community. Still, no approach has been made official yet.
Some of these solutions are harder to grasp than others, but we’ll list some of the most popular ones:

  1. setState

    Easy to understand, hard to maintain. Using setState, Flutter Framework is notified that the internal state is changed. This will schedule a Widgets build method, rebuilding the UI and reflecting the new state.

  2. InheritedWidget

    Used for propagating information down the widget tree, InheritedWidget is a parent widget created as a class with fields with data that will be used later in child Widgets. InheritedWidget has a static method that allows all the children in the tree to access its data. InheritedWidget also provides a function (notifyListeners) that will notify the Flutter if the widgets that depend on inherited data should be rebuilt.

  3. ScopedModel

    The general approach is to use the library’s three main classes. The class that will store all shareable data is a class that will extend ScopedModel’s Model class. In this class, any function that’ll make a change to the data will have notifyListeners function which will notify the widget tree that the model has been changed and the widgets that are connected to the model should rebuild too. To make our model data accessible in our widget hierarchy, we are wrapping our custom widget with the ScopedModel widget. ScopedModel will hold our class with shareable data. With the ScopedModelDescendant widget, we find the nearest model with data we need, handing that model to the builder method. Any time data in the passed model changes (notifyListeners triggers), this will rebuild our widget.

  4. Provider

    Using ChangeNotifier, ChangeNotiferProvider, and Consumer classes provided by Flutter SDK, the Provider approach is created. Creating a custom model class by extending ChangeNotifier, we can declare data and methods that will change that data that will be used in a widget tree. The methods that will change the data will call the notifyListeners method and inform the UI that data has been changed. ChangeNotifierProvider class is a widget that will provide an instance of ChangeNotifier to its descendants, making that instance accessible by calling create method. Wrapping the widget tree with ChangeNotifierProvider, in the widget’s build method that will use model data, we will declare a final variable by providing a model of the wanted type. Next, using the Consumer widget, wrap the widget that will use the declared data and in Consumer’s builder method and provide the declared variable. Anytime the provided variable is changed in the model, the notifyListeners will alarm the Consumer, and it will trigger the builder method.

  5. Redux

    Redux implementation in Dart language is based on ScopedModel. Being one of the most used approaches in web development, Redux for Flutter gives developers a proven concept in state management. The state is stored in one class, which can be changed by the action dispatched inside the application. The dispatched action holds the type of action and can have a payload. The type of action describes how the action will change the state. Changing the state will rebuild the widget.

  6. MobX

    Another popular approach implemented in the Dart language. The main concept of MobX for Dart language consists of Observables, Actions, and Reactions. Observables are data that could be changed, Actions are how the observables are mutated, simply a function that will change the observable. Reactions are observers that get notified when the tracked observable is changed. Depending on the needed reaction, we can have:

    – a reaction that will run immediately and on any change of the observable that we pass
    – a reaction only when the passed observable is changed
    – a reaction only when passed statement with wanted observable is truthy an async version of the passing statement that needs to be truthy

    Creating a class store with defined observables and actions that will mutate the observables is simplified with the mobx_codegen package which provides us annotations that will be used to declare what will be our observable (@observable) and what will be our action (@action). There is even a computed annotation (@computed), which can be used to combine observables and provide the same experience as observable and trigger the build method of widget only when some of the composing observable changes. In the custom widget, the created store will be used by instantiating the store and using the Observer widget provided by MobX. The Observer widget has a builder method that will trigger the value anytime from the store used inside the builder method is changed.
    Now we’ve listed some of the popular solutions for state management, here is our recommendation – it depends on your app. Smaller apps sometimes don’t even require state management, or require simpler ones, while bigger apps will require a more serious approach, like MobX or Provider.

Flutter Web

Perhaps the most hyped thing about Flutter currently is that it’s gone beyond mobile. Enter Flutter for the Web! Using standards-based web technologies (HTML, CSS, Javascript), mobile applications built in Flutter can comply and run in modern browsers.
This means that the same code base we write to create Android and iOS apps also creates web apps. UI we initially created for mobile, should obviously be adjusted for larger screens because browsers run on many different devices. Flutter makes this easy, offering various widgets that help us developers adjust and create responsive web apps. LayoutBuilder widget builder function provides box constraints. We can use these constraints to decide whether or not we want to show UI.
Using MediaQuery.of method in build functions, we can not only find out the sizes of a device but also the device orientation. Using those widgets, we can easily adjust the mobile app for the Web. As of December 2019, Flutter for the Web is in beta.

Flutter for desktop (macOS alpha)

macOS Flutter support is in the alpha stage, which means that the Flutter team has no intention of stopping with web support. Although the Flutter web is a huge deal, we’re excited about the desktop platform too. Having an opportunity to also cover a desktop platform with one code base is something that every developer would dream of. There are just a couple of plugins available for macOS support, so there is a lot to cover to be even considered as a serious option for development but is stable enough to play around with.

Rive

Formerly known as 2Dimensions, Rive is a great online tool that allows designers to design and create beautiful animations for Flutter applications. What makes this tool so special is that by creating amazing animations, the tool will enable us to integrate assets in the Flutter project. Created assets are interactive, and Rive promises 60fps animated graphics in real-time. This tool looks promising for creating amazing animations that could be used for better customer interaction with the application, but also in creating games with Flutter.

Supernova

Another fantastic application that needs attention is Supernova. Supernova converts Sketch and Adobe XD designs into native frontend code. The app has full Flutter support too. Importing design created in Sketch or Adobe XD, Supernova treats grouped layers as Flutter widgets. The application does not just convert the design but also allows the designers to edit and design further. With build-up tools provided by Supernova, the designer can even animate some of the assets. Once the designer is satisfied with the look of the assets, he can use the Supernova to convert the design into a Flutter code, which can be used in development. Supernova goes one step further and allows us to integrate with the mobile simulator, and by changing the design and using a hot reload, we can instantly see changes that were made. This tool truly lowers the gap between designers and developers. The Supernova team also announced that they would develop their tool from the ground up in Flutter. With all the options and tools that Supernova provides, this application has to be in the spotlight for both developers and designers that work with Flutter.

In conclusion

State management remains unsolved in 2020. Our recommendation is to be wise when choosing the solution and pick one that will suit your app the best. You don’t need to choose unnecessarily complicated ones for simple apps, and for bigger apps, we recommend Provider or MobX.
The web is in beta, and if we follow the development trend of Flutter, we expect a lot of action in this domain.
The desktop was only available for experimenting up till December 2019. We hope it will be in beta until the end of the year (no official statements have been released yet, this is only our gut feel).
Rive and Supernova were already prominent in 2019, but we expect that these tools will be even more used in 2020. These tools are excellent for designers, and developers too, because the design is translated to the code, and it makes the app development so much faster. We guess that, as Rive, Supernova will also be an online tool, because it will be written in Flutter, and Web is in beta.

Platform channel in Flutter - Benefits, and Limitations

Platform channel in Flutter – Benefits, and Limitations

One of the biggest challenges for mobile cross-platform frameworks is how to achieve the native performance of the application, and how to help developers create different kinds of features for different devices and platforms with as little effort as possible. In doing so, keeping in mind that UX should remain the same but with unique components that are specific for each particular platform (Android and iOS).

Platform Channel in Flutter - Benefits and limitations

Although cross-platform frameworks in most of the cases can resolve platform-specific tasks, there is a certain number of tasks that, with custom platform-specific code, can be achieved only through native. The question is, how those frameworks establish communication between the specific platform and application? The best example is Flutter’s Platform Channel.

Before we dive deeper into the Platform Channel (why it’s unique, how it’s implemented and what are the benefits and limitations of using it), it’s worth it to mention a few important things about why Flutter stands on top of the other cross-platform frameworks. Flutter is a relatively new framework that was first introduced at Google I/O 2017 and initially released in May 2017. It is an open-source framework resulting from the hard work of many Google experts in the past few years and drawn by their experiences with native Android. The framework is open-source, written in Dart (also open-source, and easy to learn). It’s the only cross-platform framework that can guarantee full native performance on both Android and iOS – Flutter code is compiled to native ARM machine code using Dart’s native compilers. Furthermore, Flutter is known for expressive and flexible UI with incredibly fast rendering (thanks to Google’s graphics engine SKIA). The other feature Flutter’s known for its fast development, mainly because of plenty of customizable built-in widgets and because of the magic of Hot Reload, which significantly reduces the amount of time needed to develop certain features. Anyway, the main focus of this blog and what we are currently most interested in is how Flutter offers a simple and easy way of communication with a native platform called Platform Channel.

What is Platform Channel and when should we use it?

As the Flutter community grows, more and more community plugins and packages that execute platform-specific functionalities appear. If your project requires a specific feature that is not supported in Flutter or it’s easier to implement it on the native side, you need to establish communication between native platforms (Android or iOS) and Flutter in order to execute that custom platform-specific code or call any API-s from native in Dart code. Platform Channel operates on the principle of sending and receiving messages, without code generation. The communication is bidirectional and asynchronous. The Flutter application (the portion of the app which is written in Dart) in this communication represents a client that sends messages to the host (Android or iOS) and expects a response back either as success or failure. When the message is received on the host side, we can execute necessary logic in native code (Java/Kotlin for Android or ObjC/Swift for iOS) or call any of the platform-specific API-s and send a response back to the Flutter application through the channel. When channels are created, it is mandatory to take care of naming. The name of the channel in the Flutter application needs to be the same as the one on the native side.

How to setup?

One of the basic characteristics of Platform Channel is the fact that it is easy to set up and understand both on the Flutter side, and the native side It’s also well documented and explained in the official documentation.

In order to explain how to setup/create a channel, I will create a simple example of communication between the Flutter app and Android native (Kotlin).

First, we need to create a channel in the Flutter app with an appropriate name. In this case, we can name it “platform_channel”:

static const MethodChannel _channel = const MethodChannel('platform_channel');

Then we need to create a channel on the Android side with the same name:

companion object {
 @JvmStatic
 fun registerWith(registrar: Registrar) {
 val channel = MethodChannel(registrar.messenger(), "platform_channel")
 channel.setMethodCallHandler(PlatformChannelPlugin(registrar.activity()))
 }
}

Once we create a channel, we need to create a method in the Flutter app in class PlatformChannel which will communicate with native:

static Future<String> dummy_func() async {
 String result = await _channel.invokeMethod('dummy_func');
 return result;
}

Now to get a response from this function and from native, we need to add this in the Flutter app where we want to collect this result:

static Future<String> getDummyFunc() async => await PlatformChannel.dummy_func();

And the final step is to provide an implementation for dummy_func in native:

override fun onMethodCall(call: MethodCall, result: Result) {
 when {
 call.method == "dummy_func" -> result.success(setupDummyFunc(call))
 else -> result.notImplemented()
 }
}
private fun setupDummyFunc(call: MethodCall): String {
 return "return dummy string from native"
}

With this piece of code, we can say that we established a basic communication between the Flutter app and native. Of course, this can be extended to provide any implementation that we need. If we want to pass arguments to native functions we can create a Map of values and pass it to invokeMethod as a second parameter:

Map<String, dynamic> args = <String, dynamic>{};
args.putIfAbsent("dummy1", () => “dummy1”);
args.putIfAbsent("dummy2", () => “dummy2”);
args.putIfAbsent("dummy3", () => “dummy3”);
static Future<String> dummy_func() async {
 String result = await _channel.invokeMethod(‘dummy_func’, args);
 return result;
}

Now we can access those values in native by their IDs:

dummy1 = call.argument<String>("dummy1").toString()
dummy2 = call.argument<String>("dummy2").toString()
dummy3 = call.argument<String>("dummy3").toString()

Here it is essential to mention that if we are planning to create complex communication between Dart and a platform-specific code, which involves the usage of complicated data structures, I strongly suggest using some mechanism for serializing structured data. Luckily, there is a simple solution for this provided by Google. It’s called Protocol Buffers.
Protocol buffers are platform and language-neutral mechanisms for data serialization. Even more, Google provided tutorials on how to use Protocol Buffers for the desired language.

Benefits of Platform Channel

When we are dealing with any communication, whether we are talking about communication between two or more apps, communication inside a single app, or as in our case, communication with Dart and native code, the logical question arises: is that communication safe and reliable? The Platform channel is secured, and that’s one of the important benefits that the Platform Channel offers. Within our process, there is a memory buffer for communication between Dart and native code, and there is not any interprocess communication required to establish this communication; thus, there is no way that any other outside process can access this communication. This means that Platform Channel has the same level of security as any other native Android or native iOS application.
One of the benefits of Platform Channel is communication, which is itself asynchronous and bidirectional, meaning that Platform Channel doesn’t block execution of other tasks that are independent of native code. Once the native code finishes its work, the result will be passed to the Dart, and the appropriate callback will be triggered and vice versa.
Another benefit is serialization and deserialization of values to and from messages that happen automatically when you send and receive values. This represents the valuable benefit of Platform Channel, alongside an ability to use Protocol Buffers for serializing structured data.

Limitations

Currently, the channel method can be called only from the UI thread (from the main Isolate). Calling MethodChannel and EventChannel from spawned Isolate is not possible at this moment. Performing long-running operations on the main thread can cause ‘junk’ on the Flutter application, and the platform side will block other message channels. Maybe it’s possible to create a workaround for this with ports, but the best advice is to avoid heavy lifting work on the main thread until Flutter resolves problems that happen during the call of platform channel methods from another Isolate.

Overview

Overall the Platform Channel represents a way to connect native code with the Flutter app (Dart). It can be used to implement any Flutter missing functionality using a platform-specific code (plugins) and call any APIs whether available in Java or Kotlin code on Android, or in Objective-C or Swift code on iOS. Moreover, it’s well documented and well described in the official documentation and a handy tool in cross-platform development.

Android App Architecture 4

Android App Architecture: Presentation layer [Part 4]

Android app architecture part 4

In previous articles, I described and implemented the data layer, domain layer, and data and domain modules for one of the features in our application WeatherApp. Now it’s time to implement the last missing layer of our app, the presentation layer.

What is the Presentation layer?

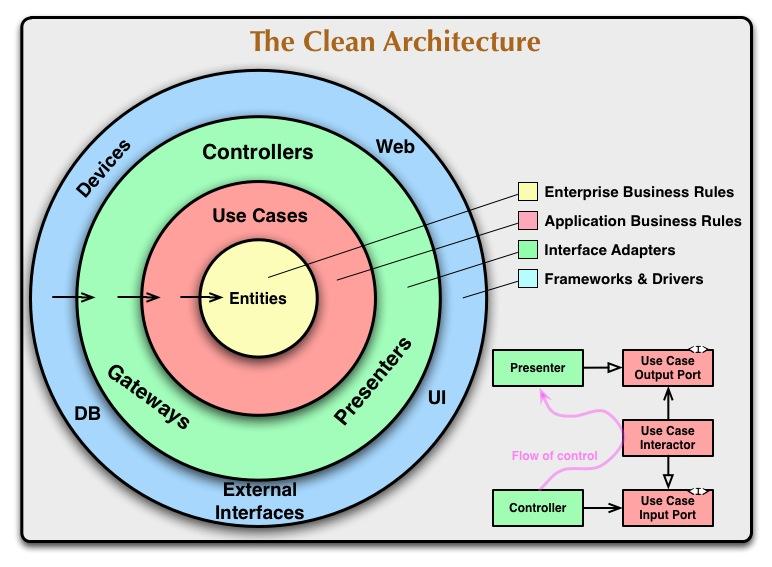
As the name suggests, this layer is responsible for presenting UI to the user. It’s used to perform necessary UI logic based on the data received through the domain layer and user interactions. In the previous article, we described and implemented our domain layer. Our presentation layer depends on it, but the domain shouldn’t know anything about the presentation layer. This presentation layer follows the MVVM architecture pattern that we described in our first article. Also, we’ll use Android Jetpack to implement this pattern correctly.

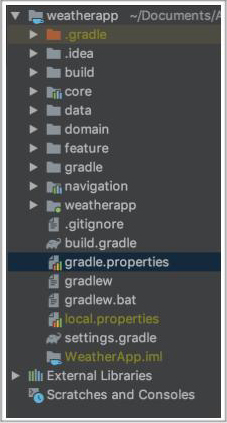
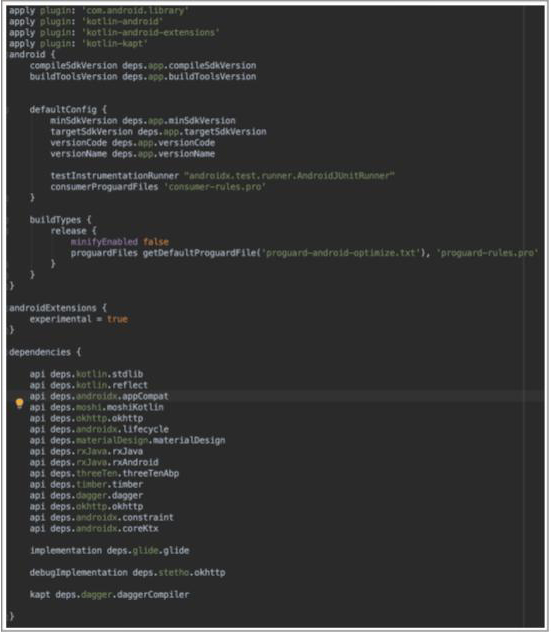
First, we need to create a presentation module for our weather feature. In the directory feature, create module feature_weather. After that, the first step is to update Gradle dependency:

dependencies {
 implementation project(':core')
 implementation project(‘:domain_weather')
 
 kapt deps.dagger.daggerCompiler
}

This module should implement necessary dependencies from the core module, and it’ll depend on the domain_weather module.

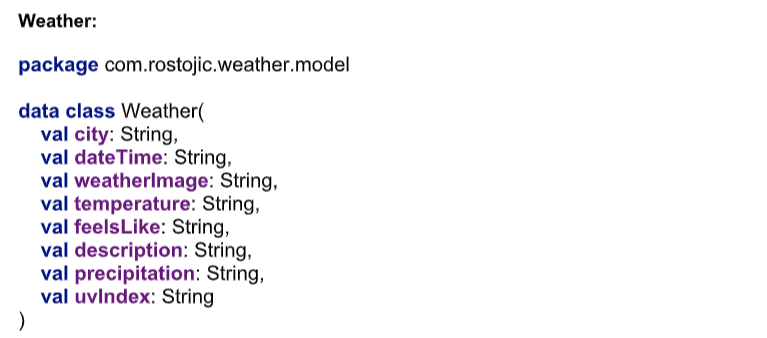
After we finish our Gradle file, the next step is to create a presentation model. This presentation model will be mapped from the domain model. Create a package called model inside main/java and data class WeatherView inside it.

package com.rostojic.weather.model

import android.os.Parcelable
import kotlinx.android.parcel.Parcelize

@Parcelize
data class WeatherView(
 val city: String,
 val dateTime: String,
 val weatherImage: String,
 val temperature: String,
 val feelsLike: String,
 val description: String,
 val precipitation: String,
 val uvIndex: String
) : Parcelable

fun Weather.mapToView(): WeatherView = WeatherView(
 this.city,
 this.dateTime,
 this.weatherImage,
 this.temperature,
 this.feelsLike,
 this.description,
 this.precipitation,
 this.uvIndex
)

To parcel this WeatherView data class, we need to modify the build.gradle of our presentation module. Below android and abode dependency add androidExtensions and set experimental to true:

androidExtensions {
 experimental = true
}

Now when we have our presentation model, we can create a design. The design won’t be complicated because it’s not an essential part of our application. We’ll implement a simple screen using ConstraintLayout to display data from the model:

Android app architecture part 4 example

Besides this main screen, we’ll have one more screen for loading and error. Create a new resource file called load_weather_fragment.xml:

<include
 android:id="@+id/viewLoading"
 layout="@layout/view_loading"
 android:layout_width="match_parent"
 android:layout_height="match_parent" />

<include
 android:id="@+id/viewError"
 layout="@layout/view_error"
 android:layout_width="match_parent"
 android:layout_height="match_parent"
 android:visibility="gone" />

This layout should include two views, view_loading, and view_error. The loading view should have just one rotating progress bar, and an error view should have a simple image viewer with an error image. Set error_view to go for now. The next step is to create two fragments, one for loading and one for displaying weather. First, create a directory called UI under main/java. Inside the UI package, create two more packages, display, and load. Inside display create a file called DisplayWeatherFragment and inside load create file LoadWeatherFragment.

DisplayWeatherFragment:

package com.rostojic.weather.ui.display

import android.os.Bundle
import android.view.LayoutInflater
import android.view.View
import android.view.ViewGroup
import androidx.fragment.app.Fragment
import com.rostojic.weather.R

class DisplayWeatherFragment : Fragment() {

 override fun onCreateView(
 inflater: LayoutInflater,
 container: ViewGroup?,
 savedInstanceState: Bundle?
 ): View? {
 return inflater.inflate(R.layout.display_weather_fragment, container, false)
 }

 override fun onActivityCreated(savedInstanceState: Bundle?) {
 super.onActivityCreated(savedInstanceState)
 setUpViews()
 }

 private fun setUpViews() {}

}

LoadWeatherFragment:

package com.rostojic.weather.ui.load

import android.os.Bundle
import android.view.LayoutInflater
import android.view.View
import android.view.ViewGroup
import androidx.fragment.app.Fragment
import com.rostojic.weather.R

class LoadWeatherFragment : Fragment() {

 override fun onCreateView(
 inflater: LayoutInflater,
 container: ViewGroup?,
 savedInstanceState: Bundle?
 ): View? {
 return inflater.inflate(R.layout.load_weather_fragment, container, false)
 }

 override fun onActivityCreated(savedInstanceState: Bundle?) {
 super.onActivityCreated(savedInstanceState)

 loadWeather()
 }

 private fun loadWeather() {}
}

Now when we have our fragments, we can create a navigation resource file on the app or feature level. For now, we’ll create it on the app level because we’ll have only two screens in our application for now. In the Weatherapp module create a navigation resource file called weather_navigation.xml and inside it set our navigation graph:

Android app architecture part 4 example2

Inside weather_navigation.xml for DisplayWeatherFragment add argument for WeatherView; we need to pass WeatherView object to DisplayWeatherFragment screen once it’s loaded to display weather data to the user:

<argument
 android:name="weatherView"
 app:argType="com.rostojic.weather.model.WeatherView"
 app:nullable="false" />

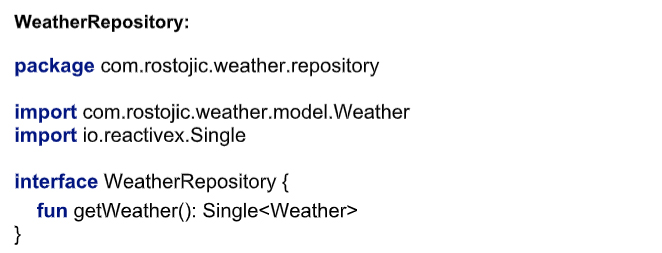
To pass the WeatherView instance to the DisplayWeatherFragment first, we need to load it from the domain layer. For loading and direct communication to the domain layer, we’ll create a view model class inside the load package called LoadWeatherViewModel. First, we’ll inject GetWeatherUseCase from the domain layer through the constructor:

class LoadWeatherViewModel @Inject constructor(
 private val getWeatherUseCase: GetWeatherUseCase
) : ViewModel()

To properly implement the observer pattern, we’ll use a lifecycle-aware data holder from Android Jetpack – LiveData. Before we use it in our view model, we need to create a LiveData extension in our core module. Inside the core module under package extensions create a new file called LiveDataExtensions and add those two extensions:

fun <T> MutableLiveData<Resource<T>>.setSuccess(data: T) =
 postValue(Resource(Resource.State.Success, data))

fun <T> MutableLiveData<Resource<T>>.setError(message: String? = null) =
 postValue(Resource(Resource.State.Error, value?.data, message))

Once we add those extensions we can create LiveData for getting weather information in LoadWeatherViewModel:

private var _getWeatherLiveData = MutableLiveData<Resource<WeatherView>>()
val getWeatherLiveData: LiveData<Resource<WeatherView>>
 get() = _getWeatherLiveData

The next step is to create a public function that’ll run GetWeatherUseCase and return Weather instance or error.

fun getWeatherData() {
 getWeatherUseCase.run {
 clear()
 executeUseCase { handleResult(it) }
 }
}

Before we create handleResult() function, we need to add a constant error string that’ll be used in both view model and fragment to identify connection error:

companion object {

 const val CONNECTION_ERROR = "connection_error"
}

Now we can implement handleResult() function:

private fun handleResult(status: GetWeatherUseCase.Status) {
 when (status) {
 is GetWeatherUseCase.Status.Success -> onGetWeatherSuccess(status)
 is GetWeatherUseCase.Status.ConnectionError -> onGetWeatherConnectionError()
 is GetWeatherUseCase.Status.UnknownError -> onGetWeatherUnknownError()
 }
}

private fun onGetWeatherSuccess(status: GetWeatherUseCase.Status.Success) {
 _getWeatherLiveData.setSuccess(status.weather.mapToView())
}

private fun onGetWeatherConnectionError() {
 _getWeatherLiveData.setError(CONNECTION_ERROR)
}

private fun onGetWeatherUnknownError() {
 _getWeatherLiveData.setError()
}

And the last but important thing is to call clear on getWeatherUseCase() in overridden method onCleared():

override fun onCleared() {
 super.onCleared()
 getWeatherUseCase.clear()
}

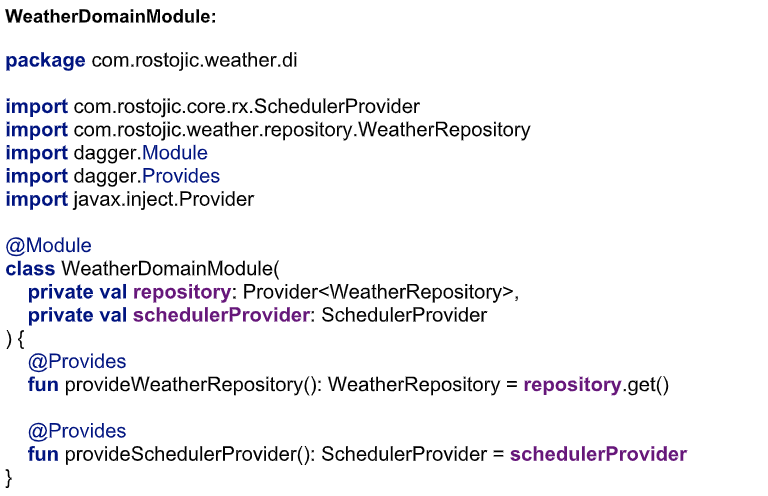
Before we implement LoadWeatherFragment we need to setup a dependency injection for this module because the first thing in LoadWeatherFragment will be injecting LoadWeatherViewModel. Under main/java create a package called di and under it create the first file called WeatherScope:

package com.rostojic.weather.di

import javax.inject.Scope

@Scope
@Retention(AnnotationRetention.RUNTIME)
annotation class WeatherScope

After WeatherScope in the same package creates a file called WeatherComponent:

package com.rostojic.weather.di

import com.rostojic.core.presentation.ViewModelFactory
import com.rostojic.weather.ui.load.LoadWeatherViewModel
import dagger.Component

@WeatherScope
@Component(dependencies = [WeatherDomainComponent::class])
interface WeatherComponent {

 fun getWeatherViewModelFactory(): ViewModelFactory<LoadWeatherViewModel>

}

This component depends on the domain component. Next is to create WeatherInjector and call it from Weatherapp module:

package com.rostojic.weather.di

object WeatherInjector {

 lateinit var component: WeatherComponent

 fun initialise() {

 component =
 DaggerWeatherComponent.builder().weatherDomainComponent(WeatherDomainInjector.component)
 .build()
 }
}

Once we’re done with dependency injection, we can continue working on our fragments. Using WetherComponent we can access our view model like this:

private val weatherViewModel by viewModel(WeatherInjector.component.getWeatherViewModelFactory())

Add this line above onCreateView(). The next step is to override onActivityCreated(), and call a public method from the view model for getting weather and method to initialize observer inside it:

private val weatherViewModel by viewModel(WeatherInjector.component.getWeatherViewModelFactory())

Add this line above onCreateView(). Next step is to override onActivityCreated() and inside it call public method from view model for getting weather and method to initialise observer:

override fun onActivityCreated(savedInstanceState: Bundle?) {
 super.onActivityCreated(savedInstanceState)

 loadWeather()
 initialiseViewModelObserver()

}

private fun loadWeather() {
 weatherViewModel.getWeatherData()
}

private fun initialiseViewModelObserver() {
 weatherViewModel.getWeatherLiveData.observe(this, Observer(::weatherReceived))
}

Function weatherReceived is responsible for performing UI logic based on Resource.State:

private fun weatherReceived(weatherResource: Resource<WeatherView>) {
 weatherResource.let {
 when (it.state) {
 is Resource.State.Loading -> onWeatherFetchLoading()
 is Resource.State.Success -> onWeatherFetchSuccess(it)
 is Resource.State.Error -> onWeatherFetchError(it)
 }
 }
}

We need to show the loading view while the result’s loading :

private fun onWeatherFetchLoading() {
 viewLoading.visibility = View.VISIBLE
 viewError.visibility = View.GONE
}

When we get an error as a result, we need to preview the error view:

private fun onWeatherFetchError(weatherResource: Resource<WeatherView>) {
 when (weatherResource.message) {
 CONNECTION_ERROR -> setConnectionError()
 else -> setUnknownError()
 }
}

If the error is CONNECTION_ERROR show connection error view otherwise show unknown error:

private fun setConnectionError() {
 viewLoading.visibility = View.GONE
 viewError.apply {
 setConnectionError()
 visibility = View.VISIBLE
 }
}

private fun setUnknownError() {
 viewLoading.visibility = View.GONE
 viewError.apply {
 setUnknownError()
 visibility = View.VISIBLE
 }
}

Currently, we don’t have different UIs for unknown and connection errors, but it can be easily extended with this logic.

If the result is a success, we’ll get WeatherView instance, navigate to DisplayWeatherFragment and pass this WeatherView object as an argument:

private fun onWeatherFetchSuccess(weatherResource: Resource<WeatherView>) {
 navigateToWeather(weatherResource.data ?: return)
}

private fun navigateToWeather(weatherView: WeatherView) {
 val bundle = bundleOf("weather" to weatherView)
 findNavController().navigate(
 R.id.action_loadWeatherFragment_to_displayWeatherFragment,
 bundle
 )
}

With this, we’re finished with loading data from the view model, and we’re done with LoadWeatherFrament. Final step is to extend function setUpView() inside DisplayWeatherFragment to display actual data from our WeatherView object that we received from LoadWeatherFragment:

private fun setUpViews() {
 val weatherView: WeatherView = arguments?.get("weather") as WeatherView
 weatherView.let {
 textCity.text = weatherView.city
 textDateTime.text = weatherView.dateTime
 Glide.with(this).load(weatherView.weatherImage).into(imageWeather)
 textDescription.text = weatherView.description
 textFeelsLike.text = weatherView.feelsLike
 textPercipitation.text = weatherView.precipitation
 textTemperature.text = weatherView.temperature
 textUvIndex.text = weatherView.uvIndex
 }
}

That is all. We have implemented the last layer of our architecture. In this article, we implemented the presentation layer for weather features following the MVVM design pattern and with the help of Android Jetpack.

Android App Architecture 3

Android App Architecture: Data Layer [Part 3]

Android app architecture part 3

In the previous article, I described the Domain layer in detail and provided concrete code snippets of how to implement it to be a crucial part of our architecture. In this article, I will try to explain what is Data layer and how we can add this layer to our architecture. As I have mentioned in previous articles, we have separate directories for each Clean Architecture layer (data, domain, feature or presentation) and inside each of them we will have modules for each feature, so based on that, in data, we need to create a new module called data_weather for our weather feature.

What is the Data layer, and how we can implement it in our WeatherApp?

The Data layer is the place where the app needs to deal with APIs and 3rd party libraries. It contains Repositories – the single source of truth for the data, Models, and Data Sources (which can be local or remote). Before we start implementing the Data layer in our application, we need first to take a look at Uncle Bob Clean Architecture image:

Clean Architecture diagram

Based on this image and my previous article, we can see that there is one base principle that outer layers depend on inner layers, thus, we always start working from the internal parts of the app (for example if we first implement UseCase, how can we return Entity if we didn’t implement it before?). After all, in the previous article, we started with an entirely independent Domain layer for our weather feature, more concretely, we began by implementing Entity, and we will continue to follow the same principle with the Data layer.
For now, in order not to make our app more complex, we will implement a parsing local JSON file called weather.json to get the required data. Later in the next articles, we will switch this for an actual API call to Apixu Weather using Retrofit. In that case, we will show how easy it is to change data sources without affecting the business logic and UI logic of our application if our architecture is correct.
In the directory, data create a data module for our feature called data_weather. Modify build.gradle file to implement core and domain_weather modules:

dependencies {
 implementation project(':core')
 implementation project(':domain_weather')
kapt deps.dagger.daggerCompiler
}

As we mentioned earlier that data_weather would depend on domain_weather module, and it will implement necessary dependencies from the core module. The next step is to create a dummy JSON file. Under leading create assets directory and inside it create dummy JSON called weather.json. Package structure should look like this:

Package structure example

Inside weather.json add dummy values:

{
 "city": "Novi Sad",
 "dateTime": "Sun, Septembar 8, 08:65",
 "weatherImage": "https://openweathermap.org/img/wn/10d@2x.png",
 "temperature": "17°",
 "feelsLike": "23/11 Feels like 17°C",
 "description": "Cloudy",
 "precipitation": "Moderate",
 "uvIndex": "40%"
}

Now we can create a repository. Inside main/java create a package called a repository, and inside it create an interface called WeatherRemoteDataSource. This interface will be a contractor to our fake data source. For now, it should have only one method getWeather(), which will return Single<Weather> because we are returning only one Weather object for now. When we switch data sources, we will change this returning type to Flowable<List<Weather>> to support back pressuring and to return a list of Weather objects.

WeatherRemoteDataSource:
package com.rostojic.weather.repository
import com.rostojic.weather.model.Weather
import io.reactivex.Single
interface WeatherRemoteDataSource {
fun getWeather(): Single<Weather>
}

The next step is to create a repository implementation class inside the same package called WeatherRepositoryImpl. This class will implement the WeatherRepository interface from our domain layer, in our case from domain_weather. Before we start coding our WeatherRepositoryImpl, we need to set a dependency injection for our data module. Inside main/java create package called di. First, we will scope class called WeatherDataScope:

package com.rostojic.weather.di
Import javax.inject.Scope
@Scope
@Retention(AnnotationRetention.RUNTIME)
annotation class WeatherDataScope

After we create a custom scope class for our data module, we need to create a module class, called WeatherDataModule. This module class will provide weather.json path for now:

package com.rostojic.weather.di
import com.rostojic.weather.repository.WeatherRepository
import com.rostojic.weather.repository.WeatherRepositoryImpl
import dagger.Binds
import dagger.Module
import dagger.Provides
import javax.inject.Named
@Module(includes = [WeatherDataModule.BindModule::class])
class WeatherDataModule {
@Provides
 @WeatherDataScope
 @Named("weather_json_path")
 fun provideJsonPath(): String = "weather.json"
@Module
 interface BindModule {
@Binds
 fun bindRepository(repository: WeatherRepositoryImpl): WeatherRepository
 }
}

Later, when we implement a fake data source, we will update this module to provide an instance of a data source. Next is a data component. This component should extend CoreComponent, which we created in the previous article, and is annotated with WeatherDataScope. This component will have only one method, which will provide WeatherRepository instance. Let’s call this component WeatherDataComponent:

package com.rostojic.weather.di
import com.rostojic.core.di.CoreComponent
import com.rostojic.weather.repository.WeatherRepository
import dagger.Component
import javax.inject.Provider
@WeatherDataScope
@Component(modules = [WeatherDataModule::class], dependencies = [CoreComponent::class])
interface WeatherDataComponent : CoreComponent {
fun getWeatherRepository(): Provider<WeatherRepository>
}

And final part for dependency injection in this module is to create object WeatherDataInjector:

package com.rostojic.weather.di
import com.rostojic.core.di.CoreInjector
object WeatherDataInjector {
lateinit var component: WeatherDataComponent
fun initialise() {
 component =
 DaggerWeatherDataComponent.builder().coreComponent(CoreInjector.coreComponent).build()
WeatherDomainInjector.initialise(
 component.getWeatherRepository(),
 component.getSchedulerProvider()
 )
 }
}

I described the purpose of this object in previous articles so we can call method initialize () inside AppInjector in weatherapp module:

private fun initialiseWeather() {
 WeatherDataInjector.initialise()
}

Once we set dependency injection we can go back to WeatherRepositoryImpl and provide an implementation for WeatherRepository interface, note that we will inject WeatherRemoteDataSource and SchedulerProvider through the constructor, on the same way that we did it in domain layer:

package com.rostojic.weather.repository
import com.rostojic.core.rx.SchedulerProvider
import com.rostojic.weather.model.Weather
import io.reactivex.Single
import javax.inject.Inject
class WeatherRepositoryImpl @Inject constructor(
 private val remoteDataSource: WeatherRemoteDataSource,
 private val schedulerProvider: SchedulerProvider
) : WeatherRepository {
 override fun getWeather(): Single<Weather> {
 return remoteDataSource.getWeather()
 .subscribeOn(schedulerProvider.io)
 }
}

Finally, we can implement our fake data source. Create package remote inside main/java and class FakeRemoteDataSource in it. This class will implement WeatherRemoteDataSource, and inside the overridden method getWeather(), we will return RxJava Single Weather instance parsed from local JSON by using library called Moshi. Moshi instance, context, and weather.json path will be injected through the constructor. Note here that we provided Moshi instance and context from the core module but weather.json path from WetherDataModule:

package com.rostojic.weather.remote
import android.content.Context
import com.rostojic.weather.model.Weather
import com.rostojic.weather.repository.WeatherRemoteDataSource
import com.squareup.moshi.JsonAdapter
import com.squareup.moshi.Moshi
import io.reactivex.Single
import java.io.InputStream
import javax.inject.Inject
import javax.inject.Named
class FakeRemoteDataSource @Inject constructor(
 private val context: Context,
 private val moshi: Moshi,
 @Named("weather_json_path") private val jsonPath: String
) : WeatherRemoteDataSource {
 override fun getWeather(): Single<Weather> {
 return Single.create<Weather> {
 val jsonAdapter: JsonAdapter<Weather> =
 moshi.adapter<Weather>(Weather::class.java)
 val inputStream: InputStream = context.assets.open(jsonPath)
 val inputString = inputStream.bufferedReader().use { reader -> reader.readText() }
 val weather = jsonAdapter.fromJson(inputString)
if (weather != null) {
 it.onSuccess(weather)
 } else {
 it.onError(RuntimeException("Could not fetch weather"))
 }
 }
 }
}

Now when we have FakeRemoteDataSource implementation, we can go back to our WeatherDataModule and update it to provide data source:

@Provides
fun provideWeatherRemoteDataSource(
 context: Context,
 moshi: Moshi, @Named("weather_json_path") jsonPath: String
): WeatherRemoteDataSource {
 return FakeRemoteDataSource(context, moshi, jsonPath)
}

With this change, we are done with our data module. In this article, I described what the data layer is and how we can implement it to fit our needs. Designing a data layer like this can help us to avoid problems in the future when we want to change the source of our data and do not affect the whole application. In my upcoming articles, I will write on how we can replace this FakeRemoteDataSource with an actual API call to Apixu weather using Retrofit. In the next section, I will describe and implement the presentation layer.

Android App Architecture 2

Android App Architecture: Domain Layer [Part 2]

Android app architecture part 2

In the previous article, we talked about the basics of Clean Architecture, MVVM and app modularization. Then we’ve created a sample WeatherApp with an initial package structure (core, WeatherApp, data, domain, feature, navigation module), gradle files…

In this article, I’ll take you through the process of creating the first feature for data parsing from local JSON that’ll display the results to the user. We can simply call this feature weather.
Following Uncle Bob’s principle of clean architecture, we’ll start with the domain layer.

The first step is to create a new module called domain_weather inside the domain directory. Each feature should have its layer, the weather feature will have three modules for each layer (data_weather, domain_weather, feature_weather – it represents the presentation layer).

What is the Domain layer and how to implement it in an Android application?

The Domain layer is the central layer of our feature. All of our business logic needs to be placed in this layer and it needs to be pure Kotlin (if you work on a Java project, it should be pure Java) with no Android dependency. The Domain layer interacts with the Data and Feature (presentation) layer using interfaces and interactors. It is also completely independent and can be tested regardless of external components. Each domain layer has a unique use case, repository, and business model.
UseCase is nothing more than a logic executing class, every logic we have in our domain layer should have UseCase. We need to interact with the data layer in our domain_weather, so we’ll create a package usecase under that module and file called GetWeatherUseCase inside the package.
Before we start coding our use case, we need to create a domain package inside our core module. Inside this package, we’ll create an abstract class called UseCase. This abstract class will be a base class for all of our usecases and when extended, it’ll force that particular usecase to provide the implementation for a method called executeUseCase where specific logic will be implemented.

Execute usecase

Those usecase classes aren’t just responsible for performing some operations (in the first article I mention that I’ll use RxJava2) but they also manage which threads will be used for performing and observing the subscription. We’ll learn more about this when it comes to the actual implementation of these usecase classes. When using RxJava in the application we’re dealing with different threads and observing in the main thread of the app (AndroidSchedulers.mainThread()). The main issue of this approach is that it requires reference to RxAndroid, so we’ll have the reference to the Android framework, and because the domain layer needs to be pure Kotlin, this situation will break the concept of separation of concerns.
Therefore, we need to create an interface to abstract our observing thread because we don’t want our domain layer to know about it. The best place to create this interface is the core module.
Inside the core module, create a package called rx, inside of it create an interface called SchedulerProvider.

Scheduler Provider

As you can see here, we’re using Scheduler from RxJava framework, this is fine because we don’t want the domain layer to be aware of RxAndroid. The next step is to create a class DefaultSchedulerProvider which will implement SchedulerProvider interface. The class will use AndroidMainScheduler – that way we can achieve the necessary abstraction.

RX Scheduler Provider

The next step is to create a domain representation of the data model, and this model will represent the business rule for the feature. In the feature, we’ll parse dummy data from the local JSON, so that the response is represented with an instance of this data model. We don’t want to know how the data layer (in our case data_weather) gets this data (it can perform some API call or retrieve data in some other way not only parsing local JSON) in this layer, but we do want to know how the data that we receive looks like so that we can construct our model. We’ll start by creating a package called model inside domain_weather and a data class called Weather inside that package.

Data class model

Once we’ve created the Weather model, we need to set and define rules of what needs to be implemented to obtain this model. That’s why we need to create a repository interface that will contain this business rule. We’ll start by creating a package repository inside the feature domain layer, once we do that, we can create an interface called WeatherRepository. This interface will be implemented by an outside data layer (data_weather) and it will implement the logic for usecase of our domain layer (domain_weather). In this interface we will provide one method for getting weather data called getWeather(), this will return RxJava Single instance (because we are getting single value, when we change local JSON with actual API call this method will return Observable or Flowable if we want to support backpressure and we will return a list of Weather instances).

Weather Repository

Before implementing GetWeatherUseCase we need to set up dependency injection for this module. Under main/java, where the packages model, repository, and usecase are located, create one more package called di. Start by creating a module class called WeatherDomainModule, this module will provide a weather repository and scheduler provider.

Domain Module

Create two more files after WeatherDomainModule, a component called WeatherDomainComponent and an object called WeatherDomainInjector. We’re following the same principle for di as we did in the previous modules.

Domain Component

Domain injector

Once we set dependency injection, we can implement our use case GetWeatherUseCase. First of all, we need to inject WeatherRepository and SchedulerProvider through the constructor of the GetWeatherUseCase and extend base UseCase class from the core module:

Class

In this case, our compiler will complain about two things, the first it will require us to override the method executeUseCase and the second one is related to the missing type in UseCase<>. Let’s fix the second error first. To have clear information about the result of usecase execution, we will create a sealed class called Status inside GetWeatherUseCase. This sealed class will contain one data class and two objects. The Data class will be returned if the execution of usecase is successful and as a parameter, it will receive our domain model Weather. Objects in Status will be used for error handling, they will describe which error happened during the execution of our usecase.

Sealed class

Now we can pass this sealed class as a type to UseCase:

UseCase

Once we do this, we can override the required method and we should get this:

Override

Before we provide an implementation for method executeUseCase we need to create CompositeDisposable to keep all our disposables in the same place, we will create it in our base UseCase class, let’s make it protected:

Protected val

After we create compositeDisposable we also need to create a method to dispose of all the previously contained disposables:

Create compositeDisposable

Now we can go back to GetWeatherUseCase to method executeUseCase and call getWeather() from weatherRepository that we received through the constructor of usecase:

Override fun

As we can see from the code snippet above, we are performing a subscription on onStatus in a new thread and observing it on the main thread. The next step is to add error handling:

onErrorReturn

We will create below executeUseCase method onError which will take one parameter of Throwable type, based on what type of error is thrown we can perform our logic:

Private fun on error

The final step is to add this disposable to our compositeDisposable.
Create a package called rx, under the core module, and add a class called RxExtensions.kt inside of it.

Import composite disposable

When we call disposeWith() in executeUseCase, the final implementation for this usecase method should look like this:

Override fun execute usecase

With this, we’ve finished our feature domain layer and reached the end of our second article about Android app architecture! In the next article, I’ll write about the feature data layer (data_weather), how to parse data from local JSON, and connect it with the domain layer using more code and examples.

Android App Architecture 1

Android App architecture: Modularization, Clean Architecture, MVVM [Part 1]

Android app architecture part 1

Based on my experience on previous projects, I decided to write an article on how to properly set up the base architecture of an android app which can be easily extended and applied to different kinds of applications.

The key concept that I’ll analyze in this series of articles involves the combination of Clean Architecture, app modularization, and MVVM design pattern in creating a modular, scalable, and testable android application. For that purpose, I created a demo application called WeatherApp that will demonstrate this approach. The whole app is written purely in Kotlin, with Android Jetpack components such as LiveData, Navigation, ViewModel… Regarding dependency injection, I’ll use Dagger2. For performing complex threading operations, maintaining synchronization, error handling, getting results back to the UI thread and so on, I will use RxJava2.

In this first article, I’ll try to give an overview of modularization, Clean Architecture, and MVVM. Furthermore, I’ll explain how app modularization is useful and how we can combine those three software design techniques to create a high-quality and scalable Android application. Also, I’ll describe the demo application WeatherApp, create an initial package structure for it and show how to deal with multiple Gradle files.

What is Modularization and why you should use it?

Modularization in Android apps represents a software design pattern that separates functionalities into modules. Each Android application can be modularized by dividing the application module into library modules. The library module will have its resources, manifest file, and classes. In the end, the build tool will merge it into a single APK.

There are a few reasons why you should consider applying modularization to your application if you haven’t already:

  • Faster build time (once you add your first module you should edit your gradle.properties file with this line: org.gradle.parallel=true – it uses all cores on your machine to build modules in parallel. Right-click into any folder in the project in Android Studio->Load/Unload Modules will open a screen where you can unload modules that you are not using and avoid their compilation).
  • Code ownership
  • Faster Continuous Integration
  • App bundles Dynamic features

Each modularized app should have:

  • Core or base module (it should contain pure infrastructure without any domain knowledge).
  • Feature modules (they are owned by a single team and they represent single features, the smaller they are, the better. The most important thing about feature modules is that they can NOT depend on other feature modules).
  • Library module (can be shared between features).
  • App module (in this module there’s no feature or infrastructure specific code, and in this module, we need to create app Dagger component).

The main point is to modularize by feature. When your features become bigger you must split them into smaller ones, and the code, which is shared or coupled between features, you can resolve with plugin pattern. It is important to mention that features can’t depend on each other but in most cases, they need to communicate. The concept that I prefer for feature to feature communication is known as string-based navigation, it consists of navigation directory which doesn’t depend on anything and it receives only primitives like IDs and return nullable intents. I will further explain this through a concrete example in our WeatherApp.

What is Clean Architecture?

The concept of Clean Architecture was originally proposed by Robert C. Martin, known also as Uncle Bob. The main goal of this approach is the separation of concerns, to separate your code into independent layers and design it to depend on abstractions instead of concrete implementations.

The clean architecture

By observing the famous “onion” image above, we can see on the horizontal line how dependency flow looks like. Based on the arrow’s direction we can see that Use Cases depend only on Entities and Entities do not depend on anything and so on…

“We should think about our applications as a group of use cases that describe the intent of the application and group of plugins that give those use cases access to the outside world” – Uncle Bob

The main reason why we should use Clean Architecture in our Android applications is that if we set it properly we will end up with an application that is independent of frameworks and libraries, independent of UI, and maybe most important – independent of data sources. There are three layers:

  • Data layer (Network data source, Disk data source)
  • Domain layer (Entities, Use Cases, Business logic)
  • Presentation layer (Activities, Fragments, UI logic)

What is MVVM?

Model-view-viewmodel is a software design pattern consisting of three layers:

  • Model (in our architecture in combination with Clean Architecture refers to a domain model, which represents a real state content).
  • View (activities, fragments, it displays data received through view-model).
  • View Model (the View Model represents an abstraction of the view, it receives data from Model, perform necessary UI logic and then expose appropriate data to the View, alongside with that, View Model manipulate the Model based on actions on the View. The View has a reference to a View Model but View Model doesn’t know anything about the View).

WeatherAPP – concrete example

To demonstrate how to design an application based on those above software architecture techniques I created a simple app called WeatherApp. The app will parse local JSON with dummy data in the Data layer and through Domain layer display results in the Presentation layer. The app will have two simple features (getting weather and displaying it on the main screen and Settings feature for changing the theme and whether unit). I created a feature Settings just to show how string-based navigation works between two features. Based on that information about the app we can create a new project from Android Studio and an initial package structure.

Once the project is created rename the app module to WeatherApp. This module will be responsible for linking all feature modules together. The next step is to create a core module. Right-click the project then New/Module and select Android Library, change library and module name to “core” or “base” if you want, select minimum SDK 21, Kotlin should be selected by default and then click finish. This core module will be responsible for providing dependency to all other modules. Every module (WeatherApp, features, libraries) should implement the core module. (I’ll show how it looks in the WeatherApp later). The next step is to create a navigation module for navigation between features. Again click New/Module, select Android Library, change the name to navigation and click finish. After adding the core and navigation module, create three directories: data, domain, and feature. Finally, the project structure should look like this:

Project structure

The next major and important step is to set gradle files. The first file that needs to be modified is the main build.gradle. Inside buildscript create ext.versions = [] and ext.deps = [].
Inside ext.versions = [] add versions for each dependency and in ext.deps = [] add dependency with appropriate versions. If you set up your gradle properly you don’t need to worry about versions of individual libraries because they all come from a central point. Here is an example for Moshi library:

Moshi library example

After you add all dependency the same way in the main build.gradle, the next step is to modify build.gradle in the core module. The core module will be responsible for providing dependency for each module in WeatherApp so it needs to look like this:

Core module

When core build.gradle file is finished, the next step is to modify build.gradle files of our modules (WeatherApp and navigation) that will implement dependencies from the core module.

WeatherApp module build.gradle:

WeatherApp module build.gradle

Navigation module build.gradle:

Navigation module build.gradle

It is important to highlight that the WeatherApp module will implement all other modules in our app, so at this moment we have only navigation and core. Once we add feature modules we will need to update this gradle file.

Before we add the first feature, we need to set up WeatherApp and the core module, in the core module under main/java package create dependency injection package called di. As I mentioned above, for dependency injection I will use Dagger2 because it’s much better than Koin for multi-module projects, in my opinion. Based on that, we need to create CoreModule and CoreComponent at the beginning:

CoreModule will for now provide context and application:

CoreModule context

CoreModule application

Besides the CoreModule and CoreComponent, we need to create one more file, more precisely, an object called CoreInjector. In this object we need to create a public function initialise() which will build DaggerCoreComponent from WeatherApp module:

Core injector

Now in the WeatherApp module create di package under main/java/ and inside this package create another object called AppInjector. This object is responsible for initializing Dagger component at the app level for each module:

App injector

And finally, we need to initialize this in our application class inside the WeatherApp module, in our case WeatherApplication.

WeatherApplication

Before we create our first feature we need to set up a navigation module. In the navigation module, we need to create two files, one for loading a class based on id (in our case loading activity, also there is possible to load fragment or service) and one for providing nullable intent.

Navigation module

Class ProvideIntent will be used for navigating between features, calling forActivity() feature will get the intent of the required activity or it will get null.

In the next article, I’ll create the first feature for fetching dummy data, as Uncle Bob described, I will start from the most inner circle – domain layer. I will create a domain module for that particular feature inside the domain directory and set dependency injection for it, use-case, repository, and entity.

Comments16

Lorem ipsum dolor sit amet, consectetur adipisicing elit. Ipsa iste inventore rem Community Guidelines.

by Simon & Garfunkel
23 0 reply 3 days ago
Cras sit amet nibh libero, in gravida nulla. Nulla vel metus scelerisque ante sollicitudin. Cras purus odio, vestibulum in vulputate at, tempus viverra turpis. Fusce condimentum nunc ac nisi vulputate fringilla. Donec lacinia congue felis in faucibus. Lorem ipsum, dolor sit amet consectetur adipisicing elit. Fugiat a voluptatum voluptatibus ducimus mollitia hic quos, ad enim odit dolor architecto tempore, dolores libero perspiciatis, sapiente officia non incidunt doloremque?