preloader

Angular 16 Signals: A Guide to Boost Your Angular Development Skills

Since the release of Angular 14, it is undeniable that each version brings many new features, and Angular 16 is no exception. With the release of Angular 16, a groundbreaking feature called “Angular Signals” has been introduced, taking the power of reactive programming to new heights.  

In this blog, we will dive into Angular 16 Signals and discover how they empower developers to build more performant and reactive applications. 

Understanding The Default Change Detection in Angular 

Angular uses the Zone.js library to enable its automatic change detection. It detects when data changes in any component of the app and re-renders the view, thus displaying the updated values or objects to end-users. By doing so, the framework ensures that the UI is synchronized with the internal state of the software; the component and the view are always in sync.  

The advantage of this approach is that changes are detected and applied to the UI automatically. The downside is that it affects the overall app performance, since the default change detection strategy checks for changes in the entire component tree each time an event occurs. This can result in performance issues if the component tree is large, or the changes are frequent. 

Signals 

A signal is a wrapper around a value that can notify interested consumers when that value changes. Signals can contain any value, from simple primitives to complex data structures. By leveraging this technology, it is possible to detect changes with the level of detail being determined by the signal variable. By observing changes at the component level, it is no longer required to go through the entire tree or use Zone JS when a signal changes. This makes Zone JS optional and can be utilized only when needed in the future. 

Signals have three core concepts called reactive primitives: signal, computed and effect. 

Signal is a wrapper around a value that can change, and it has the potential to notify the framework when the value changes. To change the value of signal, you can either use set() to set the value directly or use the update() to compute a new value from the previous one. 

A picture containing text, screenshot, font

Description automatically generated

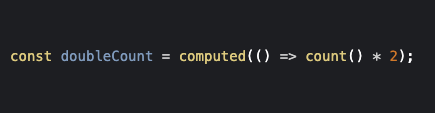
Computed is the type of signal that derives its value from other signals, and updates if values it depends on change. 

A black background with yellow text

Description automatically generated with low confidence

Effect is an operation that executes whenever the values of the signals it uses are changed. Effects always run at least once. When an effect runs, it tracks signal value reads. Whenever any of these signal values change, the effect runs again. 

A black background with white text

Description automatically generated with low confidence

The results:  

  • Unnecessary comparisons and top-down graph traversals are no longer necessary.  
  • App development has been simplified and apps have been accelerated.  
  • Signals are designed to trigger a notification mechanism that allows the underlying framework to know when it is time to update the view. 

Conclusion 

Angular 16 Signals represent a significant step forward in the evolution of reactive programming in Angular. By introducing a powerful event-driven mechanism for communication and data propagation, they enhance code modularity, scalability, and performance. So, get ready to explore the world of Angular 16 Signals and unlock the full potential of reactive programming in your applications. Happy coding! 

Reduce Maintenance Efforts with ESLint

Building high-quality apps is challenging for many reasons. Each developer has a unique way of programming, software projects need constant maintenance, and maintenance becomes increasingly complex with the growing codebase, etc. 

Fortunately, there are many tools that help us write code that is more organized, consistent, and bug-free, linter being one of them. 

What Is a Linter? 

Linter is a powerful tool that analyzes source code to identify any potential problems. It ensures that the code stays healthy and consistent, irrespective of the developer writing the code. It defines a coding standard that further simplifies the process of reviewing and maintaining the code.  

Writing JavaScript apps can easily lead to errors since the language itself has very flexible syntax and is loosely typed. However, ESLint can be used as an effective tool to reduce the risk of errors.    

Keep Your JS Code Clean with ESLint. 

ESLint is a powerful tool for ensuring that your JavaScript code follows a consistent style and adheres to a set of predefined rules. It can help catch common mistakes, enforce best practices, and make your code more readable and maintainable. ESLint works by analyzing your code and reporting any issues it finds. These issues can range from simple style issues, like missing semicolons or unnecessary whitespace, to more complex problems, like variable shadowing or the use of undefined variables. 

Get started with ESLint! 

To get started, you must create a package.json and add ESLint as devDependency. ESLint is available to download from both npm and yarn: 

npm install –save-dev eslint or yarn add eslint –dev

The next step is to add the initial configuration with some rules by running the following command:  

npm init @eslint/config or yarn create @eslint/config

Here, you’ll see a series of questions that allow you to adjust the configuration file based on your preferences: 

  • How would you like to use ESLint? 
  • What type of modules does your project use? 
  • Which framework does your project use? 
  • Does your project use TypeScript? 
  • Where does your code run? 
  • How would you like to define a style for your project? 
  • What format do you want your config file to be in? 

Based on the options selected, the ESLint CLI will create a .eslintrc configuration file in the root of your project.  
This file should contain some default settings. If you already have rules you want ESLint to enforce, you can replace some of the options in the configuration file. If you just want to use the built-in recommended rules, there are a number of predefined rule sets available, such as the popular eslint:recommended set. 

The .eslintrc configuration file consists of several sections: 
  • extends – allows you to extend your configuration file from other configurations 
  • rules – core building block of ESLint, used for configuring the rules 
  • overrides – to disable rules for a group of files 
  • plugins – set of ESLint rules related to the same subject 
  • etc. 

5 beneficial ESLint rules: 

These are some of the ESLint configurations that can help improve your project:  

  1. no-console – disallow the use of console 

It’s considered a best practice to avoid using these methods.  

Such messages are considered for debugging purposes and should be removed before pushing to production. 

  1. curly– enforce consistent brace style for all control statements 

It’s allowed to omit the curly braces when  a block contains only one statement. However, it is considered a best practice never to omit curly braces because it reduces code clarity. 

  1. no-unused-vars – disallow unused variables 

It is common that there are unused variables left somewhere in the code due to incomplete refactoring and should be removed. 

  1. sort-imports – Enforce sorted import declarations within modules 

This rule is using a specific member syntax: 

// single - Import single member. 
import myMember from "my-module.js"; 
import {myOtherMember} from "my-other-module.js"; 
// multiple - Import multiple members. 
import {foo, bar} from "my-module.js"; 
// all - Import all members, where myModule contains all the exported bindings. 
import * as myModule from "my-module.js"; 

It checks all import declarations and verifies that all imports are first sorted by the used member syntax and then alphabetically by the first member or alias name. 

  1. no-restricted-imports – Disallow specified modules when loaded by import 

It would help if you considered using this rule in these situations: 

  • When you want to disallow large dependencies which could bloat your JavaScript bundle 
  • After you define import alias, and you want to forbid the use of relative imports 
  • Some modules provide similar or identical functionality; think lodash and underscore. Your project may have standardized on a module. You want to ensure that the other alternatives are not being used as this would unnecessarily bloat the project and provide a higher maintenance cost for two dependencies when one would suffice. 

The rules that we’ve covered are just a few of the ones provided by the ESLint tool. These changes may seem minor, but they will positively affect your progress in the long run.   

Conclusion 

Linters have become an essential part of software development in general, and ESLint specifically in frontend development. They drive your team to make better decisions, save time, and increase productivity.   

If you haven’t tried it already, I recommend you give it a go! 

About Author

Meet Kristina Tadic, an exceptional software engineer with a talent for developing responsive web applications and creating innovative software solutions. With over four years of experience, Kristina has honed her skills working on various exciting client projects, from business automation software to greenfield projects. Her impressive proficiency in multiple technologies has enabled her to excel in her field and create high-quality, cutting-edge solutions.

Comments16

Lorem ipsum dolor sit amet, consectetur adipisicing elit. Ipsa iste inventore rem Community Guidelines.

by Simon & Garfunkel
23 0 reply 3 days ago
Cras sit amet nibh libero, in gravida nulla. Nulla vel metus scelerisque ante sollicitudin. Cras purus odio, vestibulum in vulputate at, tempus viverra turpis. Fusce condimentum nunc ac nisi vulputate fringilla. Donec lacinia congue felis in faucibus. Lorem ipsum, dolor sit amet consectetur adipisicing elit. Fugiat a voluptatum voluptatibus ducimus mollitia hic quos, ad enim odit dolor architecto tempore, dolores libero perspiciatis, sapiente officia non incidunt doloremque?